Interior
This section is on the interior, this includes the headliner, windows, seats and covers, and some other stuff. If you have anything to add or change please e-mail me.
Headliner
The headliner that I bought is the "one" piece kit. It is not one piece but is really fewer pieces. It should come with instructions but this will help you more than those ever will. You need to get some really good glue, I used the 3M Heavy Duty type. It will never come off. And it will stay where you put it since it is contact glue. First I installed the sewn post onto the door pillar. To do this you need to pry back the clips just enough to put the new one in. Once it is in then hammer the clips down snug. You would next glue the pieces of cloth down. I did not use any padding but you could if you wanted to. You would want to make some small cuts so that it fits good around the curves in the window frame. Once it is in place use some clips to hold it in place.
Next you want to install the strips that go under the quarter windows. These are really easy to do. Just glue and put in place. To get it to look good you might want to fold over the edge. The next thing that you want to do is to put in the main part of the headliner. first install the headliner bows and put those up in the roof of the car. Start with the smallest in the front and work toward the back. Next clip the front of the headliner to the lip and mark it so that it fits good on the curve. After that is glued you want to do the back of the headliner. Clip it up, mark, and trim it so it fits good. Make sure that it is good and tight with no wrinkles. The next thing you want to do is to stick it in over the door using something plastic that has no edge to it. Make sure this is as tight as you can get it without it pulling out of the clips. Once it is pushed in you want to hammer the clips tight using a rubber mallet covered with some clean cloth.
After that is all done, you want to glue over the rear quarter windows. this is pretty easy to do. Once this is dry you need to start to trim and pull tight going down the rear pillar thing. It is hard to describe so you will have to imagine what I am saying. This is probably one of the tightest spots you will have. I didn't put any padding in so I just glued the rest of the liner over the wheel well and trimmed it off so it looks pretty good.
Fixed windows
The windows went in fairly easy. To do this I used the string trick for the fixed windows. Once you have the seal on around the window (make sure it is in the right track), take a small cord, not string this will break, and put it in the track for the window lip. Start at the bottom and go around the window overlapping at the end. You need to put some lubricant on the seal and lip so that it goes in easier. Have someone on the outside to apply some light pressure NOT AT THE CORNERS!, but everywhere else so that it stays seated when you move on. Once it is in then go around the edge and make sure that it is pushed in all the way. Do not whack it with your fist. I'm not sure where I learned this but it works great.
Pop-outs
The pop-out windows are not hard to do but you need to have some patience to do it. Look at the window and you will see the hinge looks like an S. The open part facing out is where the lip of the window goes and the open part facing the back of the car is where the bar for the screws goes. It may be hard to understand here but if you look at it you will see what I mean. Jam that on the lip so that the holes line up, put the screw bar in the other slot and screw it down. Next put the inner rubber on the lip of the car. Start at the edge of the hinge and go around to the other edge of the hinge making sure that it is tight all along.
Speaker shelf
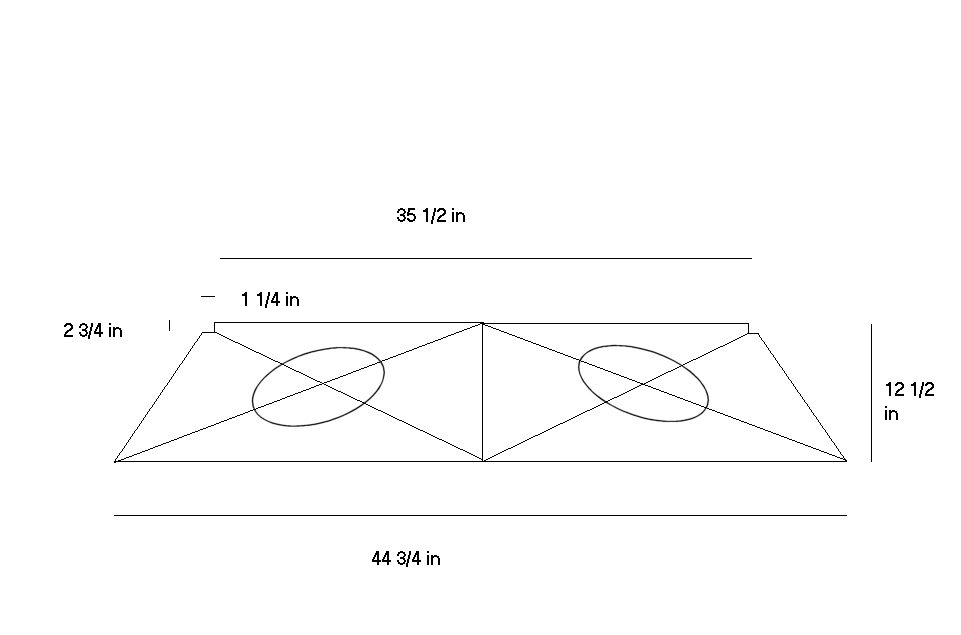
The rear speaker shelf I made was pretty easy to do and it looks good. I took a 3/4 in thick sheet of plywood (you can use a scrap piece if it is big enough). I then measured the dimensions which are in the picture below. I then cut out where I wanted the speakers and sanded the edges. I bought some black marine vinyl at a fabric place, I think half a yard. Then I glued it to the top of the shelf and stapled it to the back of the plywood. I cut the holes for the speakers and screwed them in. I found four brackets and put two on the back and one on each side of the shelf and positioned it about at the top of the back seat. This is what I did and you may want to change some of it. The picture is pretty big.
Seat redo
This part is about redoing the seats for those of you who want to know. I did the rear seat first but you can do them in any order that you want. I bought all new foam pads instead of horse hair, new covers, and sisal, I already had the hog ring stuff. First I did the back seat seat. I cut the old stuff off and got rid of everything but the metal frame. You should also check for metal rods in the front seat and the back rest to the back seat. After I cut everything off, I brushed it clean and straightened all the little metal spikes. Next I hog ringed some of the sisal to the frame. I cut it so that it would hang over the edge some. And never put the rings on the top where you sit because it will poke through and ruin your seats. next I put the cushion on the seat. You can glue it down if you feel like it will help when putting on the cover. To get the cover to go on easier you might want to put it out in the sun for a while before you start. Next with the pad on the cover stretches over it and down around the edges. Try to get it lined up before you get it all on because it doesn't slide around easily once on. Flip it over onto a clean surface (like carpet) and start in the middle attaching it to the frame. On mine hog rings were used but yours may have used the spikes, I'm not sure. Work to the edges and then to the back and then the sides. Make sure you are pulling straight up from where the material comes from. Make sure you don't pinch the string that is in the edge when you hog ring it to the frame. Once you have it all secure, pull on the string to tighten it up around the edge.
Next I did the back seat back rest. First I cut all the old stuff off cleaned it, straightened the spikes, and put the sisal on with the same amount as the seat hanging over the edge so I could hog ring it down. Next I put the pad on it. After that I took the rod from the old seat and put in the new cover lining it up in the middle of the spikes. I put the cover on the seat and flipped it over and made sure it was lined up good. And then started at the bottom and stretched the material over the middle spike working out. This could be pretty tough. I then did the top watching out for wrinkles. On the curvy part on the bottom at the edges. Do the back part first and then stretch the front over those spikes. And make sure you cut holes for the latch things that hold the seat from flipping down. And make sure that you pound the spikes down good with something.
After that I did the front seats. I cut off the old stuff, cleaned the frames, straightened the spikes, and put the sisal on the back and seat. I started with the seat part first. After the sisal went on I put the pad on. I then put the cover on and got it all straight. This was pretty hard to do and you will have to stretch it pretty good. Watch the seams to they don't rip apart. Flip it over and starting with the front pull the vinyl straight up from the top of the seat and hook it on the spike making sure that you don't pinch the string. Work from the middle around the edges and then the back. The back part has a metal rod that you need to salvage from the old seats. Once you have all the material on the spikes pull the string tight, tie it off, and pound the spikes down tight.
For the back of the front seats, you need to keep the old head rest part, and the metal rods that came out of the tracks at the bottom where the spikes are, unless you have new ones, and make sure that you took off the release lever for tipping the seat forward unless you are going to have really skinny people sit in the back. I also had two plastic things that were on the back of the two tubes going up and down and you may want to put those back in there. Once the sisal is on get the pad and put it on. At least on my seats it seemed to fit better when it was wider going across rather than up and down. Once the new pads are on put the head rest on and put some plastic over it If it had some when you took the old cover off. I found that turning the covers inside out and then folding them down over the seats made it go on easier. But make sure that you pull it down tight. At the bottom there are two channels that the metal rods you took from the old seats go in. Put the back part of the cover on the spikes first and then the front. Pound these down real good or else they will catch on the seat part and rip it. That should be be everything to redo the seats. If I forgot something e-mail me and I will fix it. Just make sure that you pound all the spikes down good, and take all the metal rods out of the old seat covers.